爬虫的四个步骤
使用 urllib.request 对 url parameters 进行转码
1
2
3
4
5
| import urllib.request
string = input('Hello World')
encode_string = string.encode('gbk')
url = 'https://www.baidu.com?keyword=' + urllib.request.quote(encode_string)
|
使用 requests 获取数据
安装
示例
1
2
3
4
5
6
7
8
9
10
11
12
13
14
15
16
17
18
19
20
21
22
23
24
|
res = requests.get('URL')
payload = {
'hello': 'world'
}
res = requests.get('URL', params=payload)
header = {
'origin':'https://y.qq.com',
'referer':'https://y.qq.com/n/yqq/song/004Z8Ihr0JIu5s.html',
'user-agent':'Mozilla/5.0 (Windows NT 10.0; Win64; x64) AppleWebKit/537.36 (KHTML, like Gecko) Chrome/71.0.3578.98 Safari/537.36',
}
res = requests.get('URL', params=payload, headers=headers)
print(type(res))
res.json()
|
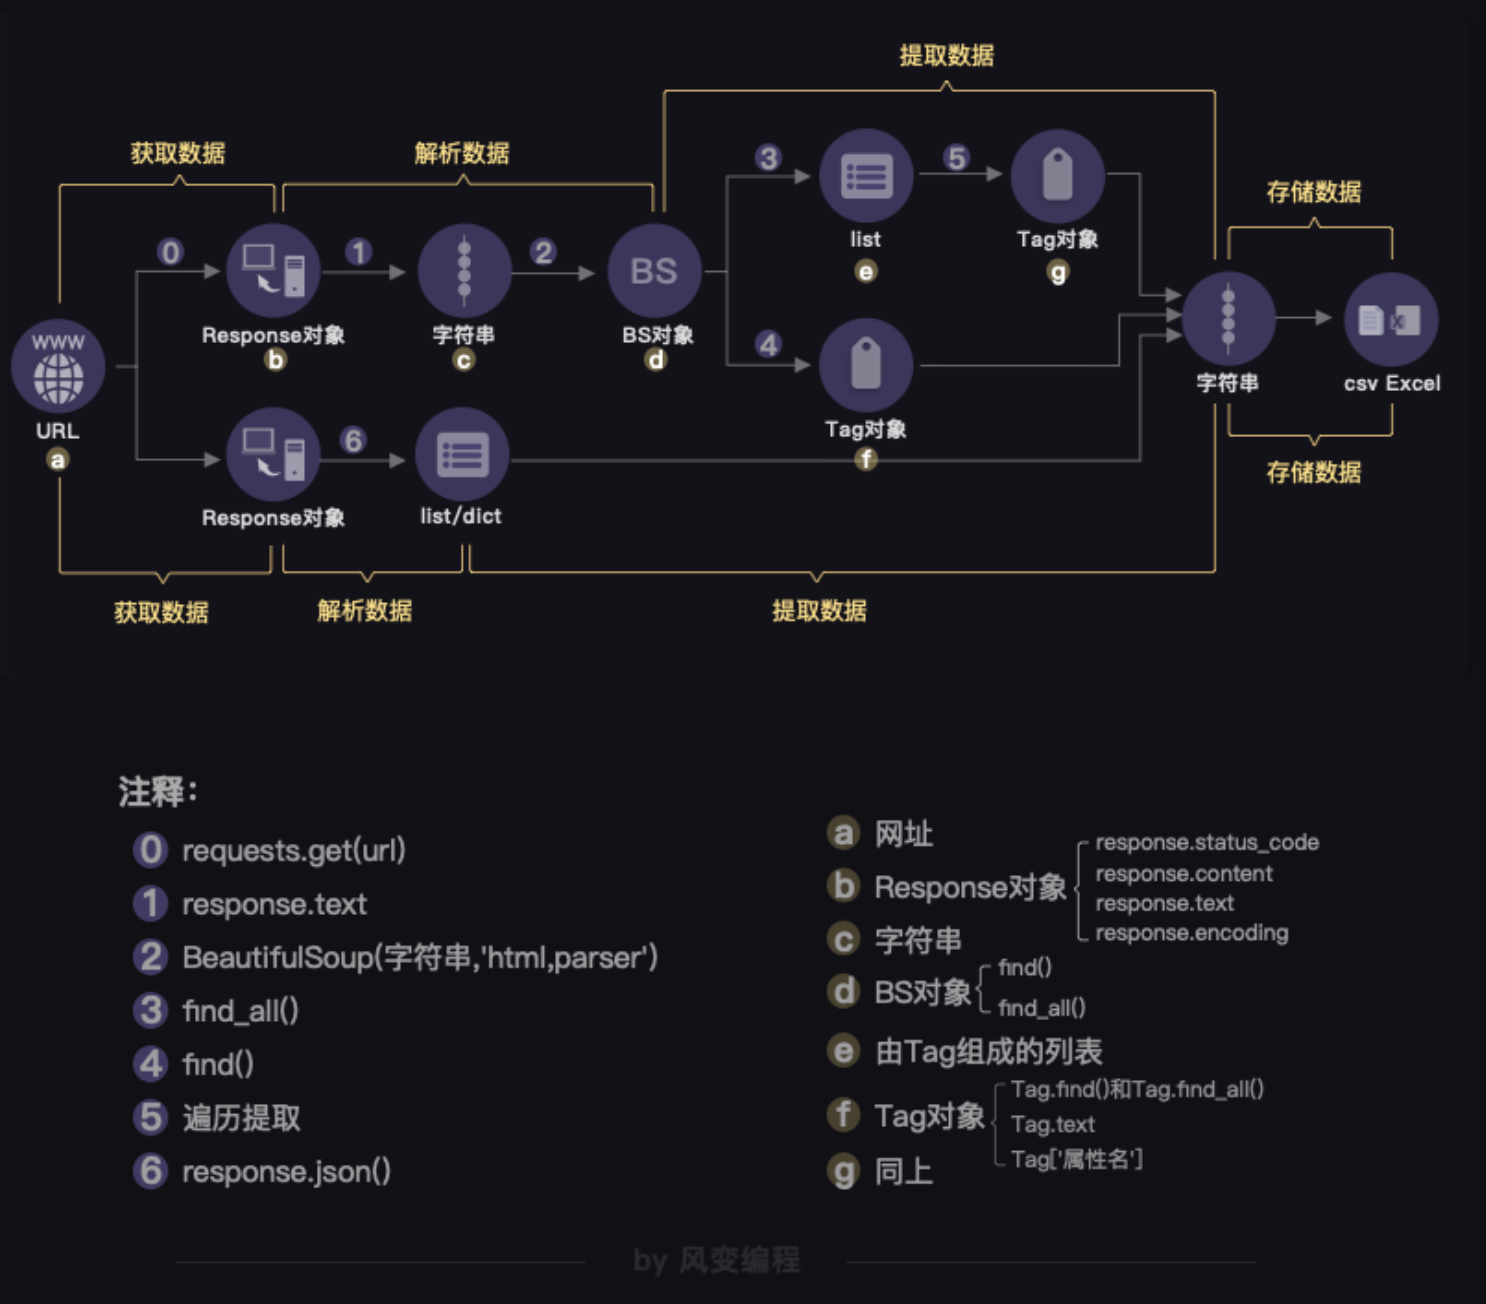
request.models.Response 类
常用成员属性:
- response.status_code - 检查请求是否成功
- response.content - 把 response 对象转换为二进制数据
- response.text - 把 response 对象转换为字符串数据
- response.encoding - 定义 response 对象的编码
request.Session - 会话对象
会话对象让你能够跨请求保持某些参数。它也会在同一个 Session 实例发出的所有请求之间保持 cookie, 期间使用 urllib3 的 connection pooling 功能。所以如果你向同一主机发送多个请求,底层的 TCP 连接将会被重用,从而带来显著的性能提升。
1
2
| session = requests.Session()
session.get('url')
|
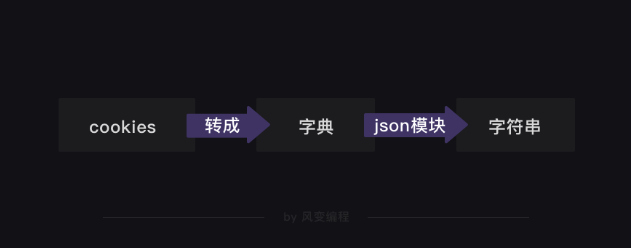
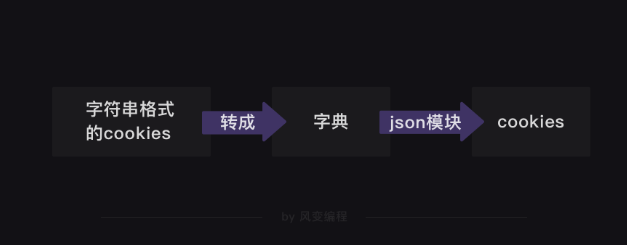
requests.cookies - 转换存储方法
1
2
3
4
5
6
7
8
9
10
11
12
13
| import requests
import json
cookies_dict = requests.utils.dict_from_cookiejar(session.cookies)
cookies_str = json.dumps(cookies_dict)
file = open('cookies.txt', 'w')
file.write(cookies_str)
file.close()
|
1
2
3
4
| cookies_txt = open('cookies.txt', 'r')
cookies_dict = json.loads(cookies_txt.read())
cookies = requests.utils.cookiejar_from_dict(cookies_dict)
session.cookies = cookies
|
使用 BeautifulSoup 解析数据
安装
1
2
|
pip3 install BeautifulSoup4
|
示例
1
2
3
4
5
6
7
8
| import requests
from bs4 import BeautifulSoup
res = requests.get('https://localprod.pandateacher.com/python-manuscript/crawler-html/spider-men5.0.html')
html = res.text
soup = BeautifulSoup(html,'html.parser')
|
BeautifulSoup 对象常用方法与属性
- 方法
- find(tag, attributes, recursive, text, keywords)
- 作用:提取满足要求的首个数据
- 用法:BeautifulSoup 对象.find(‘标签’, ‘属性’)
- 示例:
soup.find('div', class_='books')
- 返回:Tag 类对象
- find_all(tag, attributes, recursive, text, limit, keywords)
- 作用:提取满足要求的所有数据
- 用法:BeautifulSoup 对象.find(‘标签’, ‘属性’)
- 示例:
soup.find_all('div', style_='books')
- 返回:ResultSet 类对象,本质是 Tag 类对象的列表
示例
1
2
3
4
5
6
7
8
9
10
11
| import requests
from bs4 import BeautifulSoup
res = requests.get('https://localprod.pandateacher.com/python-manuscript/crawler-html/spider-men5.0.html')
html= res.text
soup = BeautifulSoup( html,'html.parser')
items = soup.find_all(class_='books')
for item in items:
print('想找的数据都包含在这里了:\n',item)
|
Tag 对象常用方法与属性
- Tag.find()、Tag.find_all():提取 Tag 中的 Tag。
- Tag.text:提取 Tag 中的文字。
- Tag[‘属性名’]:输入参数属性名,可以提取 Tag 这个属性的值。
编写爬虫通用业务流程
使用 Selenium 操控浏览器
安装
本地 Google Chrome 设置方法
1
2
3
4
5
6
7
8
9
10
11
12
13
14
15
16
17
| from selenium import webdriver
import time
# 设置 Chrome 驱动
driver = webdriver.Chrome()
# 打开网址
driver.get('https://localprod.pandateacher.com/python-manuscript/hello-spiderman/')
# 等待页面加载
time.sleep(2)
# 获取页面源码
html = driver.page_source
# 关闭页面
driver.close()
|
Selenium 提取 HTML 元素
| 方法 |
作用 |
| find_element_by_tag_name、find_elements_by_tag_name |
通过元素的标签名称选择 |
| find_element_by_class_name、find_elements_by_class_name |
通过元素的 class 属性选择 |
| find_element_by_id、find_elements_by_id |
通过元素的 id 选择 |
| find_element_by_name、find_elements_by_name |
通过元素的 name 属性选择 |
| find_element_by_link_text、find_elements_by_link_text |
通过链接文本获取超链接 |
| find_element_by_partial_link_text、find_elements_by_partial_link_text |
通过链接的部分文本获取超链接 |
Selenium 操作浏览器
1
2
3
4
5
6
7
8
|
WebElement.send_keys('123456')
WebElement.click()
WebElement.clear()
|
1
2
3
4
5
6
7
8
9
10
11
12
13
14
15
16
17
18
19
20
21
22
23
24
25
26
27
|
find_element_by_tag_name:通过元素的名称选择
find_element_by_class_name:通过元素的class属性选择
# 如<h1 class="title">你好,蜘蛛侠!</h1>
find_element_by_id:通过元素的id选择
find_element_by_name:通过元素的name属性选择
find_element_by_link_text:通过链接文本获取超链接
find_element_by_partial_link_text:通过链接的部分文本获取超链接
|
WebElement 对象常用方法与属性
- WebElement.text - 提取文字
- WebElement.get_attribute() - 输入参数
使用 Schedule 实现定时
安装
示例
1
2
3
4
5
6
7
8
9
10
11
12
13
14
15
16
17
18
19
20
21
22
23
24
25
26
27
| import schedule
import time
#定义函数
def job():
print("I'm working...")
# 部署每10分钟执行一次job()函数的任务
schedule.every(10).minutes.do(job)
# 部署每×小时执行一次job()函数的任务
schedule.every().hour.do(job)
# 部署在每天的10:30执行job()函数的任务
schedule.every().day.at("10:30").do(job)
# 部署每个星期一执行job()函数的任务
schedule.every().monday.do(job)
# 部署每周三的13:15执行函数
schedule.every().wednesday.at("13:15").do(job)的任务
while True:
# 检查并执行任务
schedule.run_pending()
time.sleep(1)
|
使用 gevent 实现多协程
安装
示例
1
2
3
4
5
6
7
8
9
10
11
12
13
14
15
16
17
18
19
20
21
22
23
24
25
26
27
28
29
30
31
32
33
34
35
36
37
38
39
40
41
42
43
44
45
46
47
|
from gevent import monkey
monkey.patch_all()
import time
import gevent
import requests
start = time.time()
url_list = ['https://www.baidu.com/',
'https://www.sina.com.cn/',
'http://www.sohu.com/',
'https://www.qq.com/',
'https://www.163.com/',
'http://www.iqiyi.com/',
'https://www.tmall.com/',
'http://www.ifeng.com/']
def crawler(url):
response = requests.get(url)
print(url, time.time() - start, response.status_code)
tasks_list = []
for url in url_list:
task = gevent.spawn(crawler, url)
tasks_list.append(task)
gevent.joinall(tasks_list)
print(time.time() - start)
|
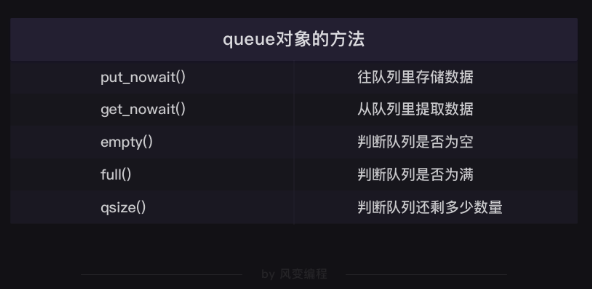
使用 queue 模块实现队列
示例
1
| from gevent.queue import Queue
|
使用 Scrapy 框架
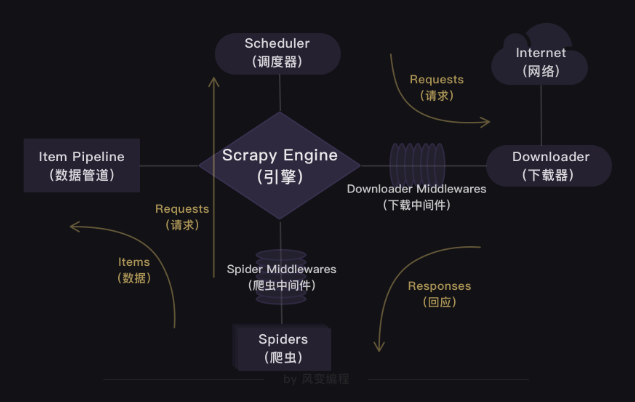
Scrapy 框架结构
- Scrapy Engine
- Scheduler
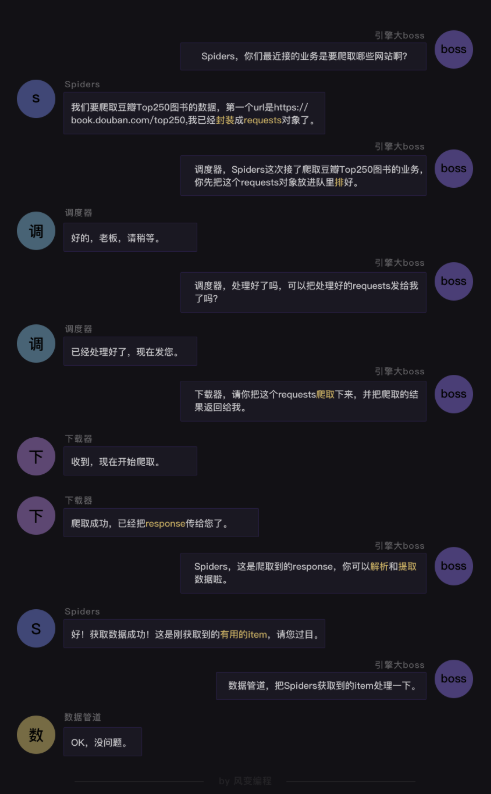
- 处理引擎发送过来的requests对象(即网页请求的相关信息集合,包括params,data,cookies,request headers…等),会把请求的url以有序的方式排列成队,并等待引擎来提取(功能上类似于gevent库的queue模块)。
- Downloader
- 负责处理引擎发送过来的requests,进行网页爬取,并将返回的response(爬取到的内容)交给引擎。它对应的是爬虫流程【获取数据】这一步。
- Spiders
- 主要任务是创建requests对象和接受引擎发送过来的response(Downloader部门爬取到的内容),从中解析并提取出有用的数据。它对应的是爬虫流程【解析数据】和【提取数据】这两步。
- Item Pipeline
- 负责存储和处理Spiders部门提取到的有用数据。这个对应的是爬虫流程【存储数据】这一步。
安装
反爬策略
- 豆瓣电影 Top250 使用 HTTP 头部进行验证
- QQ 音乐、搜索「周杰伦」使用 Ajax 进行反爬
- 查看所有 XHR,优先查看传输时间长,传输体积大的请求


